Remittance Address Setup
A Remittance Address can be selected to appear on generated invoices from the Reports functionality in netFORUM. Remittance addresses are used when creating generated invoices using the Reports module.
To set up a new Remittance Address, complete the following steps:
- Navigate to the Accounting Setup page.
- Click the Add
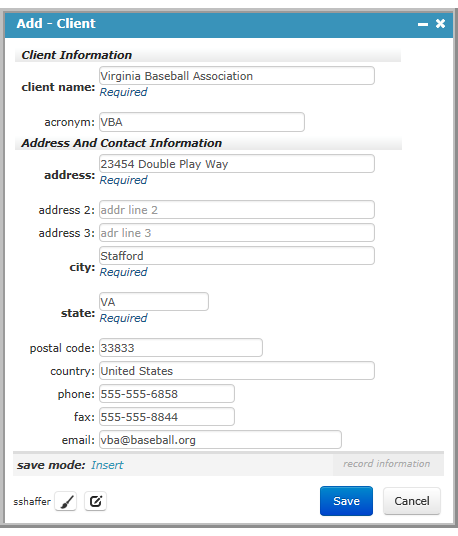
 button located on the remittance address child form. This opens the Add - Client pop-up window.

- Complete the following fields as needed:
- Click the Save button.The newly added remittance address is now available for use.
| Field Name | Required? | Description |
|---|---|---|
| client name | Required | Enter the name for the addressee. |
| acronym | Optional | Enter the acronym for the organization that will be receiving the correspondence. |
| address | Required | Enter the address for the correspondence. |
| address 2 | Optional | Enter additional address information if needed. |
| address 3 | Optional | Enter additional address information if needed. |
| city | Required | Enter the addressee's city. |
| state | Required | Enter the addressee's state. |
| postal code | Optional | Enter the zip code for the addressee. |
| country | Optional | Enter the country to which the correspondence will be sent. |
| phone | Optional | Enter the phone number of the addressee. |
| fax | Optional | Enter the fax number of the addressee. |
| Optional | Enter the email address for the addressee. |
Tips:
- Clicking the Edit
 icon opens the Edit - Client pop-up window where you can edit the remittance address (client) information.
 - Clicking the GoTo
 icon opens the Edit - Client page where you can edit the remittance address (client) information.
